Install 3DCraft and connect an AI agent
Get 3DCraft running on your computer or in your browser, and let your AI agent work in the window you are watching.
What you get
3DCraft comes as two programs, and every installer has both:
craft3d, the window. It shows your design. You look around, click on faces, play the history, set a Jig's parameters, and open, save and export files.craft3d-cli, the command line. It runs commands and scripts, renders pictures and converts files. It is also the MCP server your AI agent connects through. It needs no graphics card.
There is also a web version: 3DCraft in your browser, with nothing to install (below).
Download
Download the installer for your computer from 3dcraft.dev. The same files are on the release page of the source repository. The file names carry the version number, here 0.1.1:
| Your computer | Download | Where craft3d-cli ends up |
|---|---|---|
| Windows (64-bit) | 3DCraft-0.1.1-x86_64.msi, or 3dcraft-0.1.1-x86_64-windows.zip |
C:\Program Files\3DCraft\craft3d-cli.exe (on your PATH), or the unzipped folder |
| macOS (Apple Silicon: M1 or later) | 3DCraft-0.1.1-aarch64.dmg |
/Applications/3DCraft.app/Contents/MacOS/craft3d-cli |
| Linux (64-bit Intel or AMD) | 3DCraft-0.1.1-x86_64.AppImage, or 3dcraft-0.1.1-x86_64-linux.tar.gz |
the AppImage itself, started with cli, or ~/.local/bin/craft3d-cli |
| Any computer, nothing to install | the web version, 3dcraft.dev/app | none: the web version has no MCP |
The release page also has a .zsync file beside the AppImage. You do not need it: it is for update tools
(Installing a newer version).
Why your computer warns you
This release is not signed. 3DCraft does not yet have the certificates from Apple and Microsoft that tell your computer who made a program. So the first time you open it, Windows or macOS says it does not know the program and stops it.
That is expected, and you only get past it once. The steps below are all it takes. Nothing is switched off for other programs.
Windows
- Double-click
3DCraft-0.1.1-x86_64.msi. - A blue box appears: "Windows protected your PC". Click More info, check that the app is
3DCraft-0.1.1-x86_64.msiwith publisher Unknown publisher, and click Run anyway. - The installer may ask for an administrator's permission. It installs for all users into
C:\Program Files\3DCraft.
3DCraft is now in the Start menu, .3dcraft, .3dcraftjig and .3dcraftasm files open with it, and
craft3d-cli works in a new terminal window.
Prefer not to install? Unzip
3dcraft-0.1.1-x86_64-windows.zipanywhere and startcraft3d.exefrom the folder. SmartScreen asks the same question the first time (More info › Run anyway).
When 3DCraft starts, a black console window opens beside its window. Leave it open: closing it closes 3DCraft.
macOS
- Open
3DCraft-0.1.1-aarch64.dmgand drag 3DCraft onto the Applications folder beside it. - Open 3DCraft from Applications. macOS refuses the first time, with a message such as "3DCraft" cannot be opened because Apple cannot check it for malicious software, or "3DCraft" Not Opened. Click Done (or OK). Do not move it to the Bin.
- Allow it once, in one of two ways:
- System Settings › Privacy & Security: scroll down to "3DCraft" was blocked to protect your Mac and click Open Anyway, then confirm with your password and click Open. This works on every recent macOS, and it is the only way on macOS 15 (Sequoia) and later.
- On macOS 14 (Sonoma) and earlier you can instead right-click (or Control-click) 3DCraft in Applications, choose Open, and click Open in the question that follows.
From then on 3DCraft opens normally.
Terminal users:
xattr -dr com.apple.quarantine /Applications/3DCraft.appdoes the same as step 3. To usecraft3d-cliby name, link it onto yourPATH:ln -s /Applications/3DCraft.app/Contents/MacOS/craft3d-cli /usr/local/bin/.
Linux
Linux does not warn about unsigned programs, but a downloaded file may not run until you allow it. Both packages need a Linux from about 2022 or newer (glibc 2.35, as in Ubuntu 22.04).
AppImage (one file, nothing installed):
-
Make it executable: in a file manager, right-click › Properties › Permissions › Allow executing file as program; or in a terminal:
chmod +x 3DCraft-0.1.1-x86_64.AppImage -
Start it: double-click it, or
./3DCraft-0.1.1-x86_64.AppImagefor the window and./3DCraft-0.1.1-x86_64.AppImage cli --versionfor the command line. A link namedcraft3d-clithat points at the AppImage starts the command line too.
If it complains about FUSE, install your distribution's fuse (or libfuse2) package, or run it with
APPIMAGE_EXTRACT_AND_RUN=1.
The AppImage adds nothing to your system by itself: its menu entry, its icon and the file types .3dcraft,
.3dcraftjig and .3dcraftasm are inside it where AppImageLauncher looks, so integrating the AppImage
with AppImageLauncher gives you the menu entry and opens those files with 3DCraft; without it, the tarball
installs them.
Tarball (installs for your user into ~/.local, with a menu entry and the file types .3dcraft,
.3dcraftjig and .3dcraftasm):
tar -xzf 3dcraft-0.1.1-x86_64-linux.tar.gz
cd 3dcraft-0.1.1-x86_64-linux
./install.sh            # or ./install.sh /some/prefix; uninstall.sh removes it again
Make sure ~/.local/bin is on your PATH (most distributions do this already).
To remove 3DCraft again, run ./uninstall.sh from the unpacked folder (with the same prefix if you gave
one): it removes exactly the files install.sh installed and leaves your documents and other programs'
files alone. Unpack the tarball into a folder of its own, not into ~/.local itself: both scripts refuse
to run from inside the folder they install into.
Installing a newer version
Help › Check for updates…, or Check for updates beside the version on the start screen, opens a page of 3dcraft.dev in your browser. It says whether there is a newer version and offers the downloads. Download the same kind of file as the first time, quit 3DCraft, and install it like this:
- Windows installer (
.msi): run the new one, as in Windows. It removes the older version by itself and installs the new one in its place. An older.msidoes not install over a newer version: it says A newer version of 3DCraft is already installed. - Windows zip: unzip the new zip. It makes a folder of its own, named with the new version, beside
the old one. Start
craft3d.exefrom the new folder, and delete the old folder when you no longer need it. - macOS (
.dmg): open the new.dmgand drag 3DCraft onto the Applications folder again. Choose Replace when macOS asks whether to replace the older one. - AppImage: download the new AppImage, make it executable as the first time, and delete the old file. Or let a tool such as AppImageLauncher or AppImageUpdate do it for you: the AppImage carries the address of its newer versions. 0.1.0 is the first version that carries it: such a tool can update it as soon as a newer version is out.
- Linux tarball: unpack the new tarball into a folder of its own and run its
./install.sh, as the first time. It installs the new version over the old files. A file that only the older version had stays where it was, and the new./uninstall.shdoes not know it. To leave none behind, run the new folder's./uninstall.shfirst (with the same prefix if you gave one): it removes the older version, by the list of files that version installed (~/.local/share/craft3d/files). Then run./install.sh.
Windows and macOS may warn about the new version the first time you open it, as they did the first time (Why your computer warns you).
Your documents, the work folder and the autosave folder (Help › Open data folder) are not touched. A file you save with the newer version may not open in an older one: an older version refuses it and says so (Files › Saving).
In the browser: nothing to install
The web version is 3DCraft as a web page. Open 3dcraft.dev/app in a recent Chrome, Edge, Firefox or Safari. It can:
- open, show, save and export
.3dcraft,.3dcraftjigand.3dcraftasmfiles, and import STEP files and FreeCAD files (drop a file on the page, or use the File menu); - use Jigs: set a Jig's parameters and export the result, so you can make a laser-cut box or a Gridfinity bin without installing anything (Using a Jig);
- open the examples, Jigs and assemblies of its start screen.
It has no MCP and no command line, so an AI agent cannot drive it yet. To work with an agent, install one of the programs above.
The web version keeps nothing on a server: files are read from and written to your computer (Files › The web version). It draws with WebGPU where the browser has it, and with WebGL2 otherwise.
Check that it works
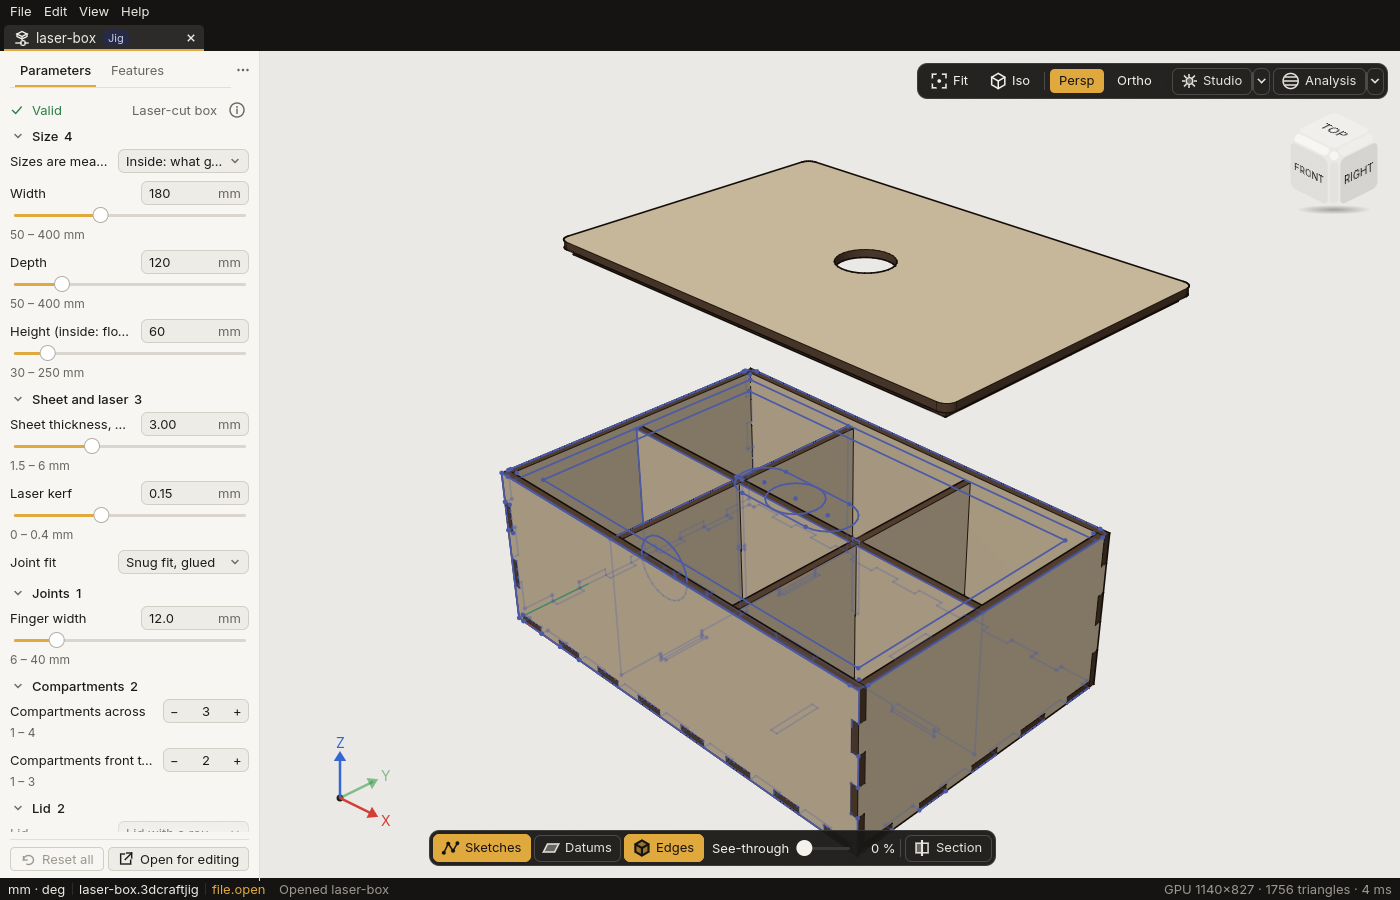
Start 3DCraft from your Start menu, Applications folder or app launcher. The window opens on the start screen. Click the T-slot aluminium profile card: 3DCraft opens it in a new tab. Your first five minutes shows you around from there.
To check the command line too, open a terminal and type the lines below. Write the full path of
craft3d-cli from the table above when it is not on your PATH.
craft3d-cli --version
craft3d-cli run --new '{"units":"mm"}' \
    --cmd feature.block --params '{"size":["40 mm","20 mm","10 mm"]}' --out box.3dcraft
craft3d-cli render box.3dcraft --out box.png
This makes a 40 × 20 × 10 mm block, saves it as box.3dcraft and draws it into box.png. The run and
render lines print their answers as lines of JSON, such as {"id":"F1","name":"Block1","status":"ok"}:
that is not an error. A number such as -5.684341886080801e-13 in them is −0.00000000000057, zero but for
the computer's rounding.
The window needs a graphics adapter: a graphics card, or a software one such as Mesa's lavapipe on Linux. Without one it says so when it starts. Everything in
craft3d-cliruns on any computer.
Connect an AI agent over MCP
An AI agent works with 3DCraft through MCP, the Model Context Protocol. Most AI tools speak it:
Claude Code, Claude Desktop, Cursor, VS Code and others. craft3d-cli mcp is the MCP server. Your AI tool
starts it, and through it the agent can run every 3DCraft command.
With the steps below, the agent models in the window you are watching. That is the way to use it.
-
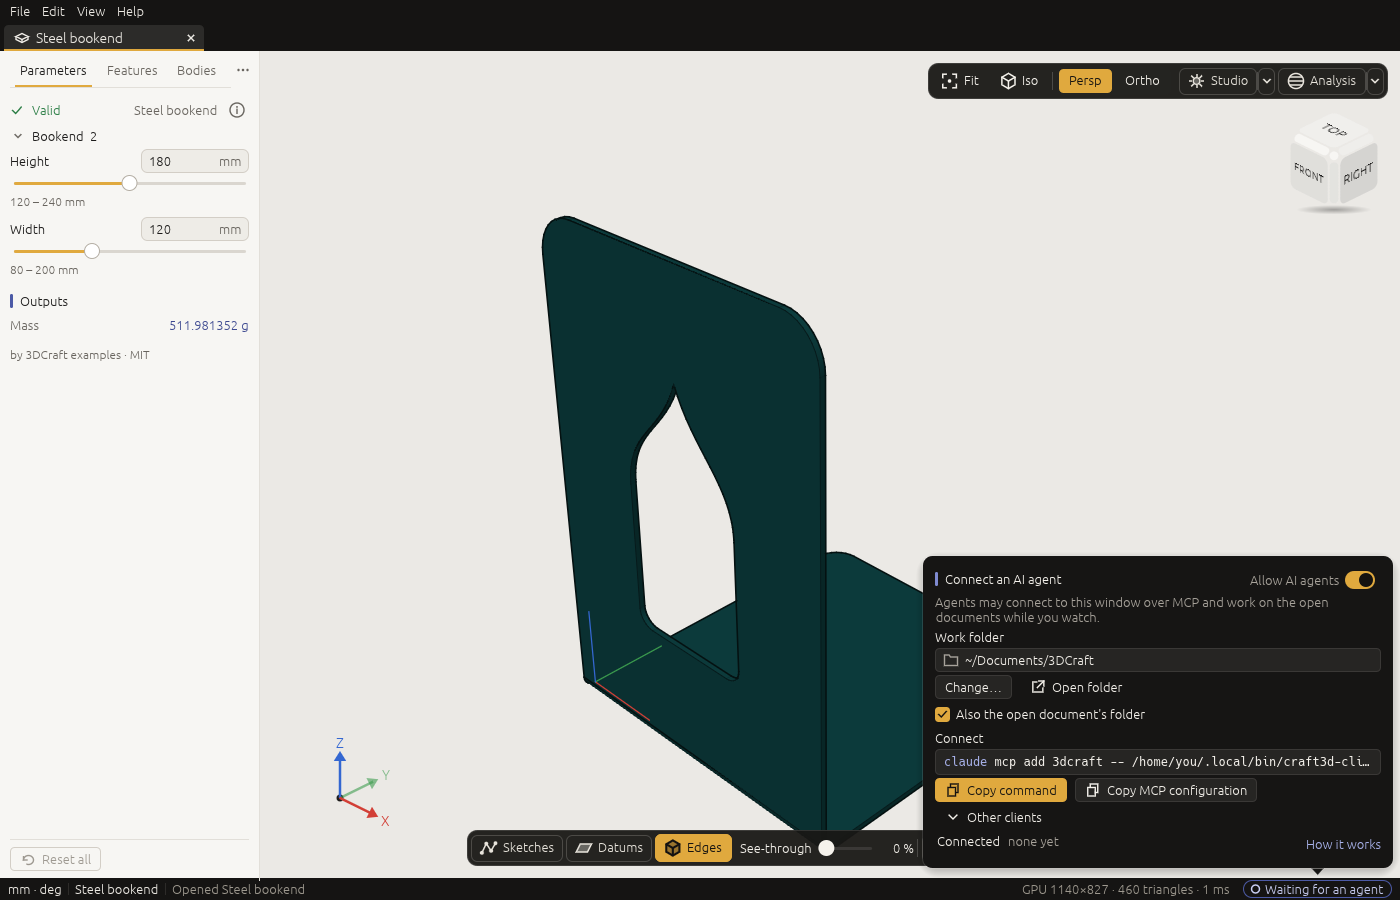
Allow AI agents. Click the agent pill at the right end of the status bar. It says Agents off. The panel Connect an AI agent opens; turn on its switch, Allow AI agents. (The start screen shows the same panel at its foot, where the window, at the size it first opens with, has to scroll down to it, and Help › Connect an AI agent… opens it too.) 3DCraft remembers your choice for the next start. The pill now says Waiting for an agent. (How it works, in the panel, opens this section of the guide.)
-
Add 3DCraft to your AI tool, once. With the switch on, the panel shows what to copy, under Connect:
-
For Claude Code, click Copy command and paste the line into a terminal:
claude mcp add 3dcraft -- /full/path/to/craft3d-cli mcp --bridge -
For Claude Desktop, Cursor and other tools configured with JSON, click Copy MCP configuration and paste it into the tool's configuration file. Claude Desktop calls that file
claude_desktop_config.json(Settings › Developer › Edit Config), Cursor~/.cursor/mcp.json, Gemini CLI~/.gemini/settings.json:{ "mcpServers": { "3dcraft": { "command": "/full/path/to/craft3d-cli", "args": ["mcp", "--bridge"] } } } -
Other clients has a ready configuration for Claude Desktop, Cursor, VS Code (its
.vscode/mcp.jsontakes"servers"with"type": "stdio") and Other (stdio), the bare command and its arguments for any client that starts a server over stdio. Choosing one copies it.
The path is filled in for your computer: on Linux with the AppImage it is the AppImage itself, followed by
cli. Nothing secret is in it: there is no password to copy or keep. Restart your AI tool after you change its configuration. -
-
Ask the agent something (Working with an AI agent), such as "Make a 40 × 20 × 10 mm block in 3DCraft". The block appears in the window. The pill turns indigo and says Claude Code connected. While the agent works, the pill names each command it runs, with a turning mark (Claude Code · feature.block), so you always see when it acts.
Click the pill at any time to see who is connected and since when. The ✕ beside an agent disconnects it; Disconnect all disconnects every one; the switch turns agents off.
If no window allows agents, the agent is told to turn on Allow AI agents, and it can carry on as soon as you do. With several 3DCraft windows open, the agent works in the one you used last when the agent connected. To move it to another window, click into that window and restart your AI tool (or close the first window).
Other AI tools
Any tool that starts an MCP server over stdio can connect. Where a tool keeps its configuration changes
between its versions; what matters is the command and its arguments, craft3d-cli mcp --bridge.
OpenAI Codex CLI reads ~/.codex/config.toml:
[mcp_servers.3dcraft]
command = "/full/path/to/craft3d-cli"
args = ["mcp", "--bridge"]
On Windows, write every \ in a path twice, in TOML as in JSON:
command = "C:\\Program Files\\3DCraft\\craft3d-cli.exe". If you write the path yourself:
| Your computer | craft3d-cli is |
|---|---|
| Windows | C:\Program Files\3DCraft\craft3d-cli.exe |
| macOS | /Applications/3DCraft.app/Contents/MacOS/craft3d-cli |
| Linux, AppImage | the AppImage itself, with "cli" as the first of the args |
| Linux, tarball | ~/.local/bin/craft3d-cli, written out in full |
Which files the agent can reach
An agent reads and writes files only in the folders the panel names:
- the Work folder, at first the folder 3DCraft in your Documents folder. 3DCraft makes it the first time. Change… picks another folder, which 3DCraft remembers; Open folder shows it;
- while Also the open document's folder is ticked, the folder of the document you have open, so the agent can export next to it. This counts only for a document you opened or saved yourself;
- folders you allowed when 3DCraft asked (below). The panel lists them; Remove takes one back.
file.open, file.save, file.export, file.import and view.render refuse any other path, also
through a shortcut (a symbolic link) that leads out of those folders. What you open or save yourself from
the File menu stays yours to choose.
3DCraft never offers your home folder itself, the folders of your keys, settings and programs, or the
system's folders. On a Mac a folder in iCloud Drive, or in your Dropbox, OneDrive, Google Drive or Box
folder, can be given, although the rest of ~/Library cannot.
3DCraft asks you first
When your AI tool connects from a project folder (Claude Code opened in ~/projects/bracket, say), the
pill turns amber and 3DCraft asks: "Claude Code wants to connect. It is working in this folder. 3DCraft
can let it read and write files there, besides the work folder", with the folder underneath.
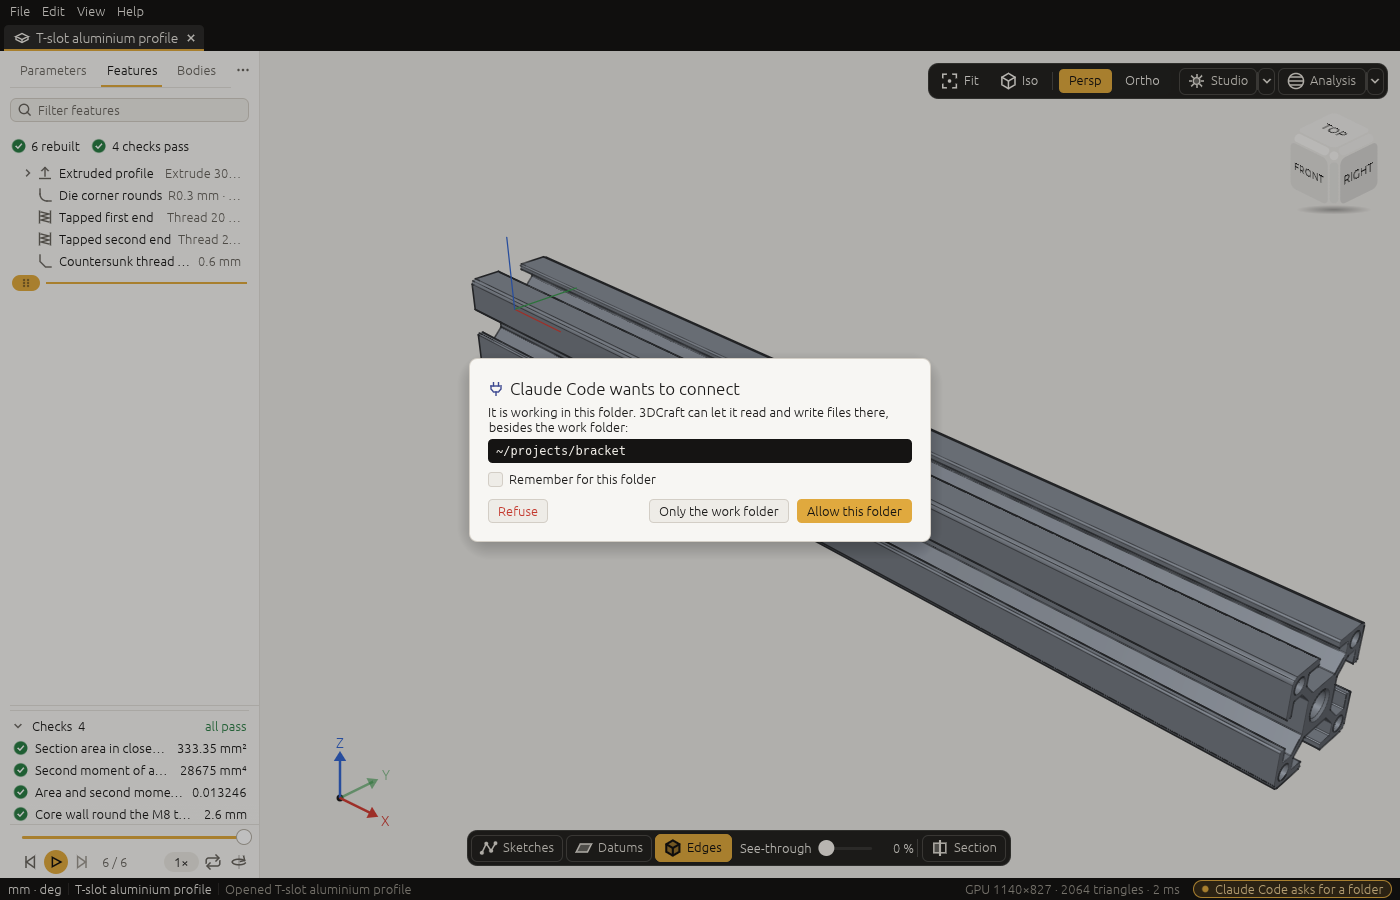
- Allow this folder allows it until you close 3DCraft. With Remember for this folder ticked, it is allowed for every agent from now on, and the panel lists it.
- Only the work folder keeps that folder out: the agent stays connected with the work folder only.
- Refuse disconnects that agent, and 3DCraft refuses it until you close 3DCraft.
After that, "make a new document with a 10 mm cube and save it in our folder" works.
If you do not answer, the agent works with the work folder only. The question stays on screen for up to ten minutes, also when the agent that asked has gone away meanwhile, and then goes by itself.
When the agent wants a file anywhere else, 3DCraft shows the file ("Claude Code asks to write a file") with Deny, Allow this folder (for every agent from now on) and Allow once (that file, for that one request). The agent waits for your answer for up to two minutes, and is told when you say no.
Only you can answer these questions; the agent cannot answer them for itself. The buttons wait a moment before they take a click, so a click meant for something else never answers.
Why a switch, and is it safe?
With the switch off, 3DCraft does not listen at all. With it on, it listens only to programs on your own
computer, and only to those that know a secret token. 3DCraft keeps that token in a file that only you can
read; the craft3d-cli your AI tool starts reads it there by itself. A web page open in your browser
cannot drive 3DCraft: it cannot read that file, and 3DCraft ignores web requests.
Headless: no window
An agent can also work without a window. It then gets a document of its own and shows you pictures it renders:
craft3d-cli mcp --automation-read-root /path/to/work --automation-write-root /path/to/work
In the client's configuration, write "args": ["mcp", "--automation-read-root", "/path/to/work", "--automation-write-root", "/path/to/work"]. This is useful on a server, or to let the agent work while
you do something else. Open the file it saved in the window afterwards.
What the agent gets
The server gives the agent these tools, and tells it how to start when it connects:
| Tool | What it does |
|---|---|
command_list |
The commands, with their parameters and a summary each (filter narrows it; brief: true gives the first sentence of each summary, id one command whole) |
command_run |
Runs one command: {"id": "feature.block", "params": {...}} |
command_batch |
Runs up to 256 commands in order (terse: true returns only failures and the last result) |
doc_inspect |
The whole document: variables, features with their status, bodies with volume, area, faces |
doc_render_preview |
A picture of the model (view, projection, box, zoom, mode: "ids") |
selection_get |
What is selected, including what you clicked in the window |
control_call |
In the window only: a method of the window (ui.get, ui.highlight, ui.screenshot, …) |
The agent needs nothing else: the command summaries and the error messages are written for it to read. Programs on 3DCraft says more about the server, for people who build on it.
What 3DCraft sends: nothing
3DCraft has no telemetry, no account, no update check of its own and no licence server. It does not connect to the internet by itself. Links you click (the guide, More examples on the start screen) open in your web browser.
3DCraft does not look for updates by itself. Help › Check for updates…, and the link beside the version
on the start screen, open the website in your browser with your version in the address (such as
https://3dcraft.dev/update/?from=0.1.1); nothing else is sent. The page says whether there is a newer
version (Installing a newer version). The web version is always the latest,
and an AppImage can be updated by a tool such as AppImageLauncher.
- The connection the window opens for your agent is open only to your own computer, and only to a program that has the token file.
- Autosaves stay in 3DCraft's data folder on your computer (Help › Open data folder).
- A bug report is copied to your clipboard and goes nowhere unless you paste it somewhere.
- The web version is a page that runs in your browser. It loads its own files from 3dcraft.dev, and your models are read from and saved to your computer, never uploaded.
Your AI tool is another matter. Everything the agent sees goes to the AI provider your tool uses, under that provider's terms: your prompts, the commands it runs, the numbers and pictures 3DCraft returns. Do not give the agent designs you may not share with that provider.
Build from source
To build 3DCraft yourself you need Rust (rustup installs the right toolchain by itself on the first build) and, on Linux, the windowing packages:
# Fedora
sudo dnf install libxkbcommon-devel wayland-devel libX11-devel libXrandr-devel libXi-devel mesa-libGL-devel gtk3-devel
# Debian, Ubuntu
sudo apt install libxkbcommon-dev libwayland-dev libx11-dev libxrandr-dev libxi-dev libgl1-mesa-dev libgtk-3-dev

git clone https://github.com/johancoppens/3dcraft
cd 3dcraft
cargo xtask fonts    # once: fetches the built-in fonts, which are not in the repository
cargo build --release -p craft3d -p craft3d-cli
This puts both programs in target/release/. To use 3DCraft's engine in a program of your own, see
Programs on 3DCraft.
Next: Your first five minutes.